Tenancy Checklist
Overview
Once you've found a tenant, there's still plenty to do before they move into the property.
From referencing and Right to Rent checks through to signing agreements and protecting deposits, it's important that each step is completed correctly and in the right order.
The Tenancy Checklist helps guide you through the entire tenant onboarding process, ensuring nothing gets overlooked.
As each step is completed, the checklist updates automatically, giving you a clear view of what still needs attention.
Accessing the Checklist
The Tenancy Checklist is available from the tenant's tenancy record.
Each item in the checklist represents an important stage in the onboarding process and can be completed directly from within PaTMa.
The checklist is designed to be worked through in order, helping ensure all legal and administrative requirements are completed before the tenant moves in.
Step 1: Tenant Details
The first step is ensuring that the tenant's information is complete and up to date.
This includes their contact details and any other information required for managing the tenancy.
Once the tenant record has been completed, the checklist will update automatically.
Step 2: Referencing
Before granting a tenancy, many landlords choose to carry out tenant referencing.
This may include affordability checks, employment verification and previous landlord references.
PaTMa allows referencing information to be recorded and stored against the tenant record for future reference.
Step 3: Right to Rent Checks
Landlords in England are required to verify a tenant's Right to Rent before the tenancy begins.
The checklist allows you to record the outcome of these checks and maintain evidence alongside the tenancy.
⚠️ Always ensure you are following the latest government guidance when carrying out Right to Rent checks.
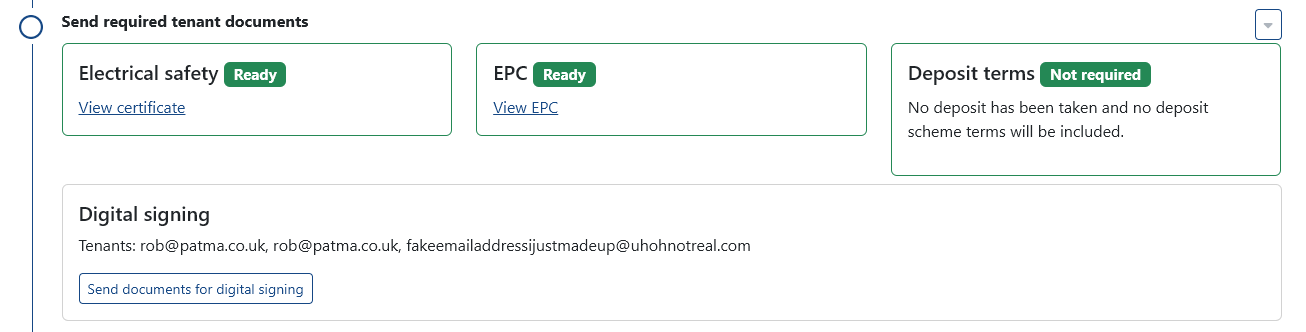
Step 4: Required Documents
Before a tenancy starts, certain documents must be provided to the tenant.
Depending on the tenancy and property, this may include:
- EPC certificates
- Gas Safety Certificates
- Electrical certificates
- How to Rent guides
- Other required documentation
Providing these documents helps ensure compliance with landlord obligations and creates a record of delivery.
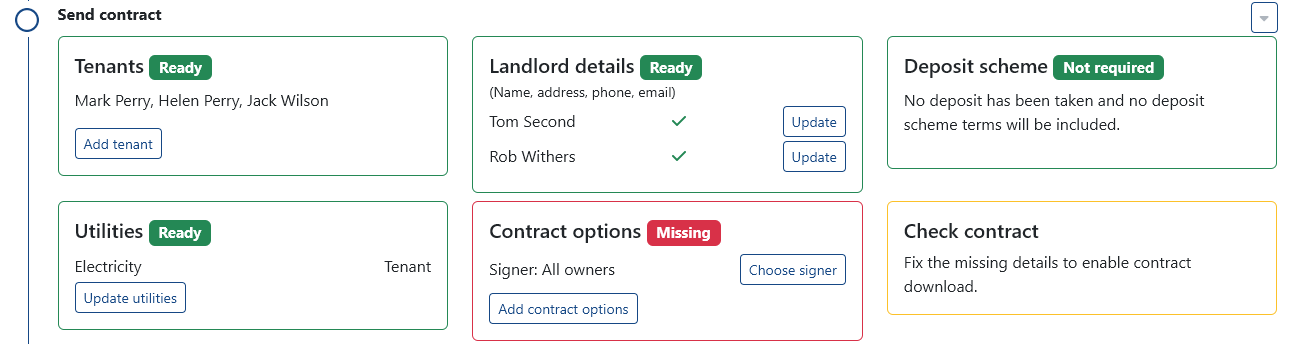
Step 5: Send Contract
With the tenancy details completed, the next step is generating and sending the tenancy agreement.
PaTMa can automatically generate the agreement using the information already stored within the tenancy record, helping reduce paperwork and ensuring key tenancy information is included correctly.
Before sending the agreement, take a moment to review the details and ensure everything is accurate, including:
- Tenant information
- Property details
- Rent amount
- Deposit information
- Tenancy dates
Once you're happy with the contents, generate the agreement and review the final document.
You can then:
- Download a copy of the agreement
- Send it to the tenant for signing
- Track the signing progress
- View completed signatures once all parties have signed
The checklist will update automatically as the agreement progresses through the signing process, making it easy to see whether action is still required.
Once the agreement has been signed by all required parties, you can move on to the remaining tenancy handover steps.
Step 6: Property Manuals
Many landlords choose to provide tenants with information about the property and any appliances within it.
Examples may include:
- Boiler instructions
- Appliance manuals
- Alarm information
- Property-specific guidance
Providing this information early can reduce future maintenance enquiries and help tenants settle in more quickly.
Step 7: Inventory
An inventory provides a record of the property's condition at the start of the tenancy.
This can be useful when assessing wear and tear or resolving disputes at the end of the tenancy.
Photographs and supporting documentation can also be stored within PaTMa.
Step 8: Deposit Protection
If a deposit has been taken, it must be protected in an approved tenancy deposit scheme within the required timescales.
The checklist helps ensure this step is completed and recorded correctly.
Step 9: Check-In
The check-in process formally records the handover of the property to the tenant.
This may include:
- Confirming key handover
- Recording meter readings
- Confirming inventory completion
- Capturing signatures where required
Once completed, the tenancy is ready to begin.
Step 10: Utility Suppliers
The final step is notifying the relevant utility suppliers about the change of occupancy.
This helps ensure bills are correctly assigned and provides a clear record of responsibility from the start of the tenancy.
Typical suppliers include:
- Gas
- Electricity
- Water
- Broadband
- Council Tax
Completion
Once all checklist items have been completed, you'll have a fully documented tenancy handover with key records stored securely within PaTMa.
The tenancy can then be managed through the Property Manager as normal, with future rent payments, maintenance tasks and tenancy updates all linked to the tenancy record.